
Whoohoo! Battle Report time!
Levi and Jason got a game on last week and were able to write up a battle report for our reading pleasure.

Prelude:
Levi - Shaltari:
My dice for last 4 games have been absolutely awful. So I came into this game fully expecting to get absolutely minced like the last few games. [I need to see if my dice are balanced using the trick Damion hinted at a while back] Sorry about the colors of the ships against the mat, it’s pretty much all the store had that made sense. We are both in the process of getting our fleets painted, so excuse that. I do believe at one point the Amethyst frigates may have been outside of coherency, but I don’t think they did anything that turn.
My dice for last 4 games have been absolutely awful. So I came into this game fully expecting to get absolutely minced like the last few games. [I need to see if my dice are balanced using the trick Damion hinted at a while back] Sorry about the colors of the ships against the mat, it’s pretty much all the store had that made sense. We are both in the process of getting our fleets painted, so excuse that. I do believe at one point the Amethyst frigates may have been outside of coherency, but I don’t think they did anything that turn.
Jason A - PHR:
My list was pretty much identical to the list I utterly destroyed Levi with the Saturday prior to this batrep. The only changes I had made was to swap the Hector for an Achilles and then swapped my Ajax and Orion into the battlegroups you see below.
My list was pretty much identical to the list I utterly destroyed Levi with the Saturday prior to this batrep. The only changes I had made was to swap the Hector for an Achilles and then swapped my Ajax and Orion into the battlegroups you see below.
Mission: Mixed Engagement
Approach: Distant
Approach: Distant
Shaltari - 996pts
4 launch assets
|
PHR - 988pts
5 launch assets
|
SR12 Vanguard battlegroup (245pts)
1 x Obsidian - 155pts - H
2 x Jade - 90pts - L
|
SR13 Vanguard battlegroup (285pts)
1 x Achilles - 165pts - H
3 x Europa - 120pts - L
|
SR13 Line battlegroup (290pts)
1 x Emerald - 100pts - M
1 x Basalt - 145pts - M
+ Star Shaman (20pts, 2AV)
3 x Voidgate - 45pts - L
|
SR12 Line battlegroup (299pts)
1 x Ikarus - 115pts - M
1 x Ajax - 100pts - M
2 x Andromeda - 84pts - L
|
SR9 Line battlegroup (296pts)
1 x Amber - 110pts - M
2 x Topaz - 90pts - L
2 x Amethyst - 96pts - L
|
SR10 Line battlegroup (237pts)
1 x Orpheus - 130pts - M
1 x Orion - 107pts - M
|
SR8 Pathfinder battlegroup (145pts)
1 x Emerald - 100pts - M
3 x Voidgate - 45pts - L
|
SR7 Pathfinder battlegroup (167pts)
1 x Theseus - 89pts - M
2 x Medea - 78pts - L
|

Turn 1:
Shaltari:
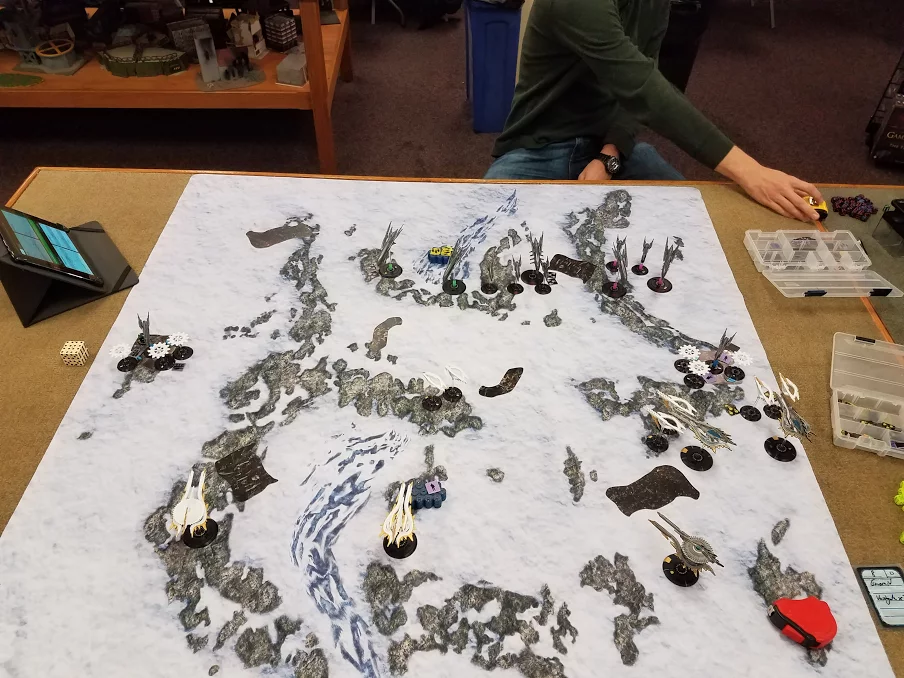
Because of the deployment type of the mission I was only able to get two battle groups onto the board. My Line and Pathfinder battlegroups, which you can see came on the bottom right corner of the table. I slowly moved my Emerald on the board to keep it as far back as possible, while I moved the gates up as far as they could go without risking the minor spike. I split my gates up for now, with the intention of getting at least one body onto the space station [the cluster of blue barrels], to possibly use the burnthrough lasers on them. The Amethyst frigates from the Line BG split to the left of the debris field, while the Amber and Topaz frigates hugged the right edge going straight towards the right side cluster. I was hoping I could get up there fast enough to put some damage on his Strike Carrier.
Because of the deployment type of the mission I was only able to get two battle groups onto the board. My Line and Pathfinder battlegroups, which you can see came on the bottom right corner of the table. I slowly moved my Emerald on the board to keep it as far back as possible, while I moved the gates up as far as they could go without risking the minor spike. I split my gates up for now, with the intention of getting at least one body onto the space station [the cluster of blue barrels], to possibly use the burnthrough lasers on them. The Amethyst frigates from the Line BG split to the left of the debris field, while the Amber and Topaz frigates hugged the right edge going straight towards the right side cluster. I was hoping I could get up there fast enough to put some damage on his Strike Carrier.
PHR:
My only battlegroup which fit the strategy rating limit for the Distant Approach was my Pathfinder group with my Theseus and 2x Medea’s. I max thrusted on my Medea’s up 14” onto the board and dropped them into Low Orbit. I decided to use some of the debris fields as cover for my Theseus and moved it up the center of the table to try and get on the flank of the approaching frigates.
My only battlegroup which fit the strategy rating limit for the Distant Approach was my Pathfinder group with my Theseus and 2x Medea’s. I max thrusted on my Medea’s up 14” onto the board and dropped them into Low Orbit. I decided to use some of the debris fields as cover for my Theseus and moved it up the center of the table to try and get on the flank of the approaching frigates.

Turn 2:
Shaltari:
This turn I was able to bring on my heavier Line BG (the Basalt, Emerald, and three Voidgates), and my Vanguard group, which consisted of the Obsidian and two Jade frigates. I rushed two Voidgates up to the left cluster because there was not a lot of PHR reinforcement there, so I didn’t have to worry about spikes that much. Their Emerald also hugged the back line using the third Voidgate as a daisy chain. The Basalt also slowly floated from the board edge right up the middle. The Vanguard group also came on the board on the far right side keeping a tight grouping. My Pathfinder group [Amber, Topaz, Amethyst] started maneuvering around the debris field towards the PHR Theseus.
This turn I was able to bring on my heavier Line BG (the Basalt, Emerald, and three Voidgates), and my Vanguard group, which consisted of the Obsidian and two Jade frigates. I rushed two Voidgates up to the left cluster because there was not a lot of PHR reinforcement there, so I didn’t have to worry about spikes that much. Their Emerald also hugged the back line using the third Voidgate as a daisy chain. The Basalt also slowly floated from the board edge right up the middle. The Vanguard group also came on the board on the far right side keeping a tight grouping. My Pathfinder group [Amber, Topaz, Amethyst] started maneuvering around the debris field towards the PHR Theseus.
In the launch phase I destroyed his token on the right cluster and was able to place a single troop on the Industrial sector, and the Military sector. My gates were not close enough to the left sector to drop anything. I also placed a single troop on the Station on my side of the board. Finally, I was able to send four bomber tokens towards the PHR Theseus, which were delayed because they were beyond their single thrust range.
PHR:
On the second turn I was able to bring on the rest of my battlegroups and tried to have Levi activate first in order to tactically field my groups to counteract his. My Pathfinder BG (Theseus and 2x Medea’s) was relatively uneventful as I continued to move my Theseus up and dropped my Medeas into atmosphere to start landing troops. This eventually turned into the wrong decision for my Theseus without the major support of the rest of my fleet. My Vanguard BG (Achilles and 3x Europa’s) moved up the center behind the Theseus and again planned on using the cover from the debris fields.
My first Line BG (Orion and Orpheus) dropped into low orbit and moved up as far as they could next to the space station in the middle of the board on my side to drop troops onto the station during the launch asset phase. The final Line BG (Ikarus, Ajax and 2x Andromeda’s) came up my far left flank to try and stay back, but still be able to support with fighters/bombers. When Levi sent 4 bombers to my Theseus I sent 4 fighters from my carriers, however only 3 made it from moving through the debris field.
Turn 3:
Shaltari:
This turn was fairly eventful for the Shaltari. Starting from the left of the board to the right. I moved all three of my Voidgates into the left side cluster to drop as many troops as possible. The Emerald floated up as slowly as possible, trying to stay behind the debris field. My Basalt also slowly floated up, just behind the station. The Amethyst frigates moved forward, along with the Topaz frigates and Emerald in the same battlegroup, to target the PHR Theseus. Between them and the bombers from the previous launch phase, I was able to put down enough damage to destroy it. My other Emerald and Voidgates received the Station Keep order so the Emerald stood still, while the Voidgates bumbled around in atmo near the right side cluster. The Vanguard group slowly moved up and took some shots on the PHR Ikarus.
During the launch phase my Voidgates on the right side cluster destroyed his Dropships, but couldn’t do the same for the left side cluster. The right side clusters defence battery was controlled by me, so I took a potshot at his Medea, but nothing significant happened. I dropped one more troop token in the Industrial sector and the City sector, while putting a tank on the Military sector. The left cluster received one troop on the Industrial, Military, and City sectors. I also split my bombers (2x2) on the PHR Achilles, and the PHR Orpheus.
PHR:
This was the beginning of the downfall of the PHR in terms of VPs on the clusters. My Medeas were bombarding sectors to try and clear the enemy troops out, but with 3 Voidgates over each cluster was going to take some time. Also, Levi’s dice rolled a lot better this game than last when I tried to deploy my dropships and couldn’t effectively land troops. My Theseus was able to get one round of shooting off before the bombers and other shots from the Topaz’s destroyed it. The rest of my force was still too far behind to really support my Theseus, hence my comment earlier of sending it too far forward alone is a BAD IDEA.
I moved my Achilles and Europa’s up to line up with as much firepower as I could in order to threaten his Amber, Obsidian, and the supporting frigates. My Ikarus, Ajax and Andromeda’s turned towards the center of the board in order to start bringing their broadsides to bear.

Turn 4:
Shaltari - 23VP:
This turn hurt us badly, although the Emerald Motherships were relatively unscathed, which is all that matters. Starting from left to right again: The Voidgates bumbled around some more in atmo, their Emerald went as far forward as possible to try and avoid the broadside arcs of the PHR Orpheus [HA! Yea right…]. The basalt moved forward and to the right to target the PHR Achilles. That along with fire from the other Emerald and the Obsidian (and their CAW’s) was enough to finally take down the big mama-jama Achilles. Although before I could do that, the PHR force was pretty much able to erase all my frigates in a single turn. In the end, PHR conceded after we tallied points, he just couldn’t get enough boots on the ground with two Medea’s. And I had gotten too far ahead in points already.
This turn hurt us badly, although the Emerald Motherships were relatively unscathed, which is all that matters. Starting from left to right again: The Voidgates bumbled around some more in atmo, their Emerald went as far forward as possible to try and avoid the broadside arcs of the PHR Orpheus [HA! Yea right…]. The basalt moved forward and to the right to target the PHR Achilles. That along with fire from the other Emerald and the Obsidian (and their CAW’s) was enough to finally take down the big mama-jama Achilles. Although before I could do that, the PHR force was pretty much able to erase all my frigates in a single turn. In the end, PHR conceded after we tallied points, he just couldn’t get enough boots on the ground with two Medea’s. And I had gotten too far ahead in points already.
PHR - 5VP:
This was a great turn in terms of firepower hitting the Shaltari, but not so great in the amount of VPs I earned from clusters (STUPID VOIDGATES!!!!). I moved up my entire force near the center and was able to hit multiple frigates and cruisers throughout the turn. My Achilles launched the torpedo at the Obsidian, which rolled a 1 when I tried to hit it (AAAAARRRRRGGGGGHHHH!)[*Levi Here* I almost felt bad, until I remembered how many times I failed ramming rolls in our past games. Hint: 1 out of 5 succeeded lol] If it would have hit it probably would have killed it after I hammered it with my heavy broadsides and CAW.
This was a great turn in terms of firepower hitting the Shaltari, but not so great in the amount of VPs I earned from clusters (STUPID VOIDGATES!!!!). I moved up my entire force near the center and was able to hit multiple frigates and cruisers throughout the turn. My Achilles launched the torpedo at the Obsidian, which rolled a 1 when I tried to hit it (AAAAARRRRRGGGGGHHHH!)[*Levi Here* I almost felt bad, until I remembered how many times I failed ramming rolls in our past games. Hint: 1 out of 5 succeeded lol] If it would have hit it probably would have killed it after I hammered it with my heavy broadsides and CAW.
Postlude:
Shaltari:
Surprising game for me, my dice didn’t act like they just got back from the Arctic Circle, and I was able to find my loaded dice when rolling for the Voidgate defense battery. Phew! That saved my bacon. Before this game I was absolutely set on having as many Particle special rule weapons as I could fit (I really like that consistent damage), but after using the Disintegrator batteries on the Topaz and Amber again, I may be swayed. I’ll have to play a few more games concentrating on both types, but that weapon system did the most damage this game hands down. After the game was conceded we played another round for the fun of it. That’s when we came across an interesting interaction: Cracked Armor and Raised Shields. We played it like Hawk ruled the Scald/Shield rule, so when my Obsidian got the Cracked Armor result, even with raised shields - I had a 5+ save. Which brings me to my next point, Shaltari has a very hard decision to make, either raise shields for an increased save (where a ship could come in and easily CAW you to do death - no PD with shields raised) or you leave them lowered and have an awful armor save, but have a healthy pool of PD. I ran into that a few times this game.
PHR:
PHR tactics is set very much like Age of Sail tactics where you have to get within a pack of enemy ships and launch everything at once. I shouldn’t have sent my Theseus up the center without any support. Instead I should have waited for the rest of my fleet to arrive the second turn and then moved up together in one large supporting fleet. My dice rolling was pretty average save for my one torpedo shot which should have hit [sorry, but I chuckle at this - Levi]. I don’t know if bringing the Achilles was the right choice over the Hector, but I wanted to see what a torpedo could do to a heavy cruiser, along with the heavy broadsides [I think it can be a really nice tool, but will need to play it more.]. I probably should have sent my Orpheus over to the nearest cluster to support with the ground combat instead of moving up the center as well. All in all it was a great game and I enjoyed trying to continue learning about the intricacies of PHR and Shaltari tactics.
PHR tactics is set very much like Age of Sail tactics where you have to get within a pack of enemy ships and launch everything at once. I shouldn’t have sent my Theseus up the center without any support. Instead I should have waited for the rest of my fleet to arrive the second turn and then moved up together in one large supporting fleet. My dice rolling was pretty average save for my one torpedo shot which should have hit [sorry, but I chuckle at this - Levi]. I don’t know if bringing the Achilles was the right choice over the Hector, but I wanted to see what a torpedo could do to a heavy cruiser, along with the heavy broadsides [I think it can be a really nice tool, but will need to play it more.]. I probably should have sent my Orpheus over to the nearest cluster to support with the ground combat instead of moving up the center as well. All in all it was a great game and I enjoyed trying to continue learning about the intricacies of PHR and Shaltari tactics.
Lyraeus's Thoughts:
Seems like a great game but frustrating on the PHR's part. This is an example of why I believe in that the PHR need a Troopship per ~500 points and four to six Medea Strike Carrier's to be effective.
The Shaltari are one of the best ground force factions in the game. While they don't have a troopship, they make up for it by being able to have a weaker Defense Battery on station by as early as Turn 1.
To counter the Shaltari, I HIGHLY recommend going over how you will handle twoEmerald Motherships at 999 points and three Emerald Motherships at 1500 points.
Credits:
Check out WarGaming Mats for their beautiful line of vinyl 4x4 and 6x4 mats for Dropfleet, Star Wars Armada, and X-Wing (and maybe a few other games!) and some new Cluster vinyl sets.
For tokens, acrylic and MDF please check out The Model Exchange for all those needs, they have acrylic stations, clusters, debris, Battlegroup Spike and Layer trackers and so much more!
We are working on a Christmas Special that has Nigel covering all of the Beasts of War Bootcamp details. The Patreon page will be getting a special extended cut of that with some discussions we will have so please support us on there to get all of that and more. Every patron helps fund The HotLZ and keeps us wanting to do more in the way of contests, prizes, and support for our community. We don't do this for money but it takes money to keep this going. Thank you again for your support!
Nice Battle report! You can kill the ships, but the clusters will win you the game! Don't know if I like the starting positions you used. As a UCM player my firepower is in larger SR BG's. Hmm may have to rethink that for my fleet. Love reading these BR's so please do more. cheers.
ReplyDeleteLoving the articles, keep it up!
ReplyDeleteAs far as Troopships go I think you may be on to something with the PHR, after another close fought game, we came to a draw even though I had managed to obliterate almost every one of his ships by game end, the Jellies just couldn't take the ground assets to win, I started strong seizing but between bombardment and a heavier compliment of Troopships/Dropships he just took the board.
I'm thinking of building my Shaltari Fleet and trying them out soon, I'm enjoying the Scourge, but I think the Shaltari may need a tad more finesse.
I look forward to your next battle report!